Thursday 28 November 2013

Grafikon simboli u pletenju (Knit Chart Symbols)


Bod grafikoni u pletenim i heklanim obrascima se koriste sve više i više kao dodatak ili umesto reči da opiše obrazac boda . Slede standardizovane pleteni simboli koji su usvojeni od strane članova Craft Yarn Council se smatraju najjasniji i najlakše za izražavanje i za čita. Za najveći deo je svaki simbol predstavlja bod(petlju) kao što izgleda na desnoj strani rada . Uvek se odnose na obrascu za dodatne definicije simbola .

Stitch charts in knit and crochet patterns are being used more and more as an addition to or in place of words to describe a pattern stitch. Following are the standardized knit symbols that have been adopted by members of the Craft Yarn Council and are considered to be the clearest and easiest to render and to read. For the most part each symbol represents a stitch as it looks on the right side of the work. Always refer to the pattern key for additional symbol definitions.


Kako pročitati skraćenice za pletenje (How to Read Knitting Abbreviations)

Znajući kako da čitate skraćenice za pletenje postaje sve lakše što više radite sa pletenim obrascima. 
Uobičajene skraćenice za pletenje uključuju RS (desna-prava strana), WS (druga-pogrešnoj strana), beg (početak) i rep (ponavljanje) .
Pattern instrukcije objašnjavaju neke neuobičajene skraćenice ili one koji mogu da se razlikuju od modela do modela.

Knowing how to read knitting abbreviations becomes easier the more you work with knitting patterns. Common knitting abbreviations include RS (right side), WS (wrong side), beg (beginning), and rep (repeat). Pattern instructions explain any unusual abbreviations or ones that may vary from pattern to pattern.
This table shows some of the most common pattern abbreviations.


Common Knitting Abbreviations
Abbreviation What It Means Abbreviation What It Means
beg beginning pwise purlwise (as if to purl)
CC contrasting color rem remain(s) or remaining
ch chain rep repeat
cn cable needle RH right-hand
dec decrease(s), decreased, or decreasing RS right side(s)
dpns double-pointed needles rnd(s) round(s)
foll follows or following sc single crochet
inc increase(s), increased, or increasing sl slip, slipped, or slipping
k knit sl st slip stitch
k2tog knit 2 stitches together ssk slip, slip, knit the slipped stitches together
k-b knit in stitch below St st stockinette stitch
kwise knitwise (as if to knit) st(s) stitch(es)
LH left-hand tbl through the back of the loop
lp(s) loop(s) tog together
MC main color WS wrong side(s)
m1 (or m) make 1 stitch (increase 1 stitch) wyib with yarn in back
p purl wyif with yarn in front
pat(s) pattern(s) yb yarn back
p-b purl in stitch below yf yarn forward
pm place marker yo yarn over
psso pass slipped stitch over (used for decreasing)


Sunday 24 November 2013

Crochet Snail - Heklanje puža (TUTORIAL)


  1. I started out making a little ring of single crochet, and then spiraled around, increasing every other stitch. 
  2. Once the spiral wraps around a couple times, I started making bigger stitches every few stitches. So, I went from single, to half-double, then to double. The idea is to gradually increase the width of the stitches.
  3. Once you've made a few dc's, then it's time to start a new color. Do not tie off or cut the first yarn; you're going to pick it up again. Take your second color and hook it into the base of your last stitch, as in the beginning of the yellow in the picture above. Then proceed to hook the second color into the spiral, increasing the same way as you did with the first color. Hook the second color around until you've done a few dc's.
  4. Leaving the second color loose (once again, don't tie it off), go back to your first color and start hooking it into the spiral you just made with the second color, gradually going from dc, to halfdc, to sc. The idea is to decrease the stitch width gradually so it blends smoothly with the second color. I think I made 13 or 14 stitches, still increasing every other stitch (two stitches in a stitch, then one stitch, then two, and so on). That's confusing. You're making smaller and smaller stitches, but still increasing the number of stitches. Does that make sense? I hope so. Then you can tie off the first color. 
  5. Now tie your third color (pink in these pictures) into the base of the last dc of your second color (the same way you tied the second color into the first). Spiral around again, still increasing every other stitch, but this time make some triple crochets where you want it wider (the top of the snail's shell). Once you go around the top, start making smaller stitches again, until you get to bottom. Tie off the third color.
  6. Now go back to the second color and start stitching into the third color. Stitch dc's into the first 3 or 4 stitches, then make the last 2 triple crochets, to make his cute little face, and tie off. If you're super motivated, you could stitch in some little eyeballs.

How to crochet a butterfly - Kako heklati leptira (TUTORIAL)


To create the abdomen and antennae, cut a coordinating piece of thread or yarn about four to six inches long (depending on your butterfly's size). Leaving a short tail, wrap the piece around the middle of the butterfly twice. Tie ends in a double knot. Trim antennae.


Teeny Tiny Butterfly Crochet Pattern

Supplies:
*Embroidery floss
*Size 6 crochet hook

Ch 4. Sl st into first st to form a ring.

*Ch 2. 3dc into ring. Ch 2. Sl st into ring.* Repeat once.

*Ch 1. 3dc into ring. Ch 1. Sl st into ring.* Repeat once.

Fasten off. Create abdomen and antennae.


Small Butterfly Crochet Pattern

Supplies:
*Embroidery floss
*Size 6 hook

Ch 4. Sl st into first ch to form a ring.

*Ch 4. 3tr (treble stitch) into ring. Ch 3, sl st into ring.* Repeat once.

*Ch 3. 3dc into ring. Ch 3, sl st into ring.* Repeat once.

Fasten off. Create abdomen and antennae.

This card uses the small pattern.


Medium Butterfly Crochet Pattern

Supplies:
*Embroidery floss
*Size C hook

Ch 4. Sl st into first ch to form a ring.

*Ch 4. Work 3 dtr (double treble stitch) into ring. Ch 4, sl st into ring.* Repeat once.

*Ch 3, work 3tr into ring. Ch 3, sl st into ring.* Repeat once.

Fasten off. Create abdomen and antennae.


Large Butterfly Crochet Pattern

Supplies:
*Sport weight yarn
*Size C hook

Ch 4. Sl st into first ch to form a ring.

*Ch 4. 3tr (treble stitch) into ring. Ch 3, sl st into ring.* Repeat once.

*Ch 3. 3dc into ring. Ch 3, sl st into ring.* Repeat once.

Fasten off. Create abdomen and antennae.


Extra Large Butterfly Crochet Pattern

Supplies:
*Sport weight yarn
*Size G hook

Ch 4. Sl st into first ch to form a ring.

*Ch 4. Work 3 dtr (double treble stitch) into ring. Ch 4, sl st into ring.* Repeat once.

*Ch 3, work 3tr into ring. Ch 3, sl st into ring.* Repeat once.

Fasten off. Create abdomen and antennae.


I've mostly been making the small butterflies. Love them!

Tuesday 19 November 2013

Easy Snowflake Christmas Decoration - Jednostavna Pahuljica Božićna Dekoracija


They are simple to vary .....
Make them in one colour, or with a contrast colour edging
or make them two tone
with the centre and edging in the same colour


These instructions use UK terminology

Use a medium weight yarn. I made these with DK yarn and a 4mm hook.

Chain 3 stitches and join with a slip stitch into a circle.

Chain 1, then make 5 double crochet stitches into the circle. Join with a slip stitch. (6sts)

Chain 5, then make 3 trebles and chain 2 into next 5 stitches, make 2 trebles in last stitch and join to first 5 chain with a slip stitch.
Chain 2, then (make 2 trebles, chain 3, make 3 trebles) into the first chain space, then (make 3 trebles, chain 3, make 3 trebles) into each chain space all around. Join with a slip  stitch.
To make an edging ( if desired) ~ in the same or a contrasting colour

Double crochet all around.
 
To make a hanging cord ( if desired) ~ chain 30. Attach to the motif. 

Have fun ....

Monday 18 November 2013

Crochet Flower Brooches - Heklanje Cvetnog Broša

1. Cream daisy flower: 
(Make two alike in different colors)

Magic circle.
Round 1: 5 sc in the loop. Do not join.
Round 2: 2 sc in each stitch around (10 sc)
Round 3: 1 sc in the next stitch, 2 sc in the next stitch (15 sc in total)
Round 4: * Slip stitch to the next sc, ch 2, 4 dc in the next stitch, ch 2, slip stitch to the next stitch to complete the first low petal. Repeat from * for the remainder (5 petals in total).
Round 5: * Slip stitch to the 1st chain of the first ch-2, sc in the next chain, work 1 hdc in the first dc, 1 dc in the same stitch, dc increase in each of the next 2 stitches, 1 dc in the 4th dc, 1 hdc in the same stitch, sc in the next ch-2 space, sl st in to the previous sl st. Repeat from * for the remainder.
Round 6: * Sc in the next sl st, ch 2, 3 dc increase in the next 3 stitches, 1 dc in the next st, 1 hdc in the same stitch, 1 hdc in the next stitch, 1 dc in the same st, 3 dc increase in the next 3 stitches, ch 2, sc in the previous sl st. Repeat from * for total of 5 petals.
Cut the tail, fasten off and weave in ends.

Use a contrast colored thread to sew 2 layers together with petals are alternate to each other. Sew the center as it looks like in the picture.

Crochet a tiny flower to sew it in the center (magic circle, * ch 5, sl st into the loop. Repeat 4 times from * to finish) or just simply sew a button in center to complete the pistil.

2. Other daisy flower in Orange: 

Magic circle, 
Round 1: Ch 3 (count as the first dc), 15 dc in the loop, join with sl st to the first ch 3. (16 dc)
Round 2: Work in back loop only: 2 dc in each dc around (32 dc)
Round 3: Ch 1, sc in the same stitch, ch 5, sc in the next stitch, *sc in the next stitch, ch 5, sc in the next stitch (16 ch-5 spaces in total).
Round 4: * Slip st to the ch-5 loop, ch 2, work 9 dc in the ch-5 loop, ch 2, sl st into the loop. Repeat from * for the remaining loops. (16 petals in total)
Cut the yarn and fasten off.
Round 5: Join new thread to the front loop created at round 2, repeat the instruction for round 3.
Round 6: repeat round 4.
Fasten off.

Make a tiny flower (magic circle, * ch 9, sl st into the loop. Repeat 9 times from * to finish) to sew in center. Add button in center to make the pistil look a bit different.

3. Colorful flower with many layers of petal:
Magic circle,
Round 1: Ch 1, 16 sc in the loop. Join with a slip stitch to the first sc.
Round 2: Ch 1, sc in the same stitch, ch 3, skip one sc, * sc in the next stitch, ch 3, skip 1 sc.
Repeat from * for the remainder. Join with a sl st to the first sc (8 ch-3 loops in total).
Round 3: ch 1, * 1 sc, 1 hdc, 1 dc, ch 2, 1 dc, 1 hdc, 1 sc into the loop. Repeat 7 times total from * (8 petals total)
Round 4: ch 1, * front post single crochet around the first sc in round 2, ch 4. Repeat 7 times total from *. Join with sl st to the first FPSC (8 ch-4 loops in total)
Round 5: ch 1, * 1 sc, 1 hdc, 2 dc, ch 2, 2 dc, 1 hdc, 1 sc into the loop. Repeat 7 times total from *.
Round 6: ch 1, * front post single crochet around the previous FPSC in round 4, ch 5. Repeat 7 times total from *. Join with sl st to the first FPSC (8 ch-5 loops in total)
Round 7: ch 1, * 1 sc, 1 hdc, 3 dc, ch 2, 3 dc, 1 hdc, 1 sc into the loop. Repeat 7 times total from *.
Round 8: ch 1, * front post single crochet around the previous FPSC in round 6, ch 6. Repeat 7 times total from *. Join with sl st to the first FPSC (8 ch-6 loops in total)
Round 9: ch 1, * 1 sc, 1 hdc, 3 dc, 1 tr, ch 2, 1 tr, 3 dc, 1 hdc, 1 sc into the loop. Repeat 7 times total from *.
Round 10: ch 1, * front post single crochet around the previous FPSC in round 6, ch 6. Repeat 7 times total from *. Join with sl st to the first FPSC (8 ch-6 loops in total)
Round 11: ch 1, * 1 sc, 1 hdc, 4 dc, 1 tr, ch 2, 1 tr, 4 dc, 1 hdc, 1 sc into the loop. Repeat 7 times total from *.

Complete this pattern you will have 5 layers of petal, change color for each if desired.

*** To turn them into a brooch or a hair scunchi:
Cut a circle of felt fabric or crochet a circle with sc for 7 rounds and sew in place in the back of the flower.
Here is a pattern for a circle just in case:

Magic circle,
Round 1: Ch 1, 8 sc in the loop. Do not join.
Round 2: 2 sc in each sc around (16 sc). Mark the first sc with a contrasting color maker.
Round 3: 1 sc in the next stitch, 2 sc in the next stitch (24 sc)
Round 4: sc increase in every 3 stitches (30 sc)
Round 5: sc increase in every 4 stitches (36 sc)
Round 6: sc increase in every 5 stitches (42 sc)
Round 7: sc increase in every 6 stitches (48 sc)
Round 8: sc increase in every 7 stitches (54 sc)
Skip 1 stitch, slip stitch to the next stitch to join.
 
Attach a brooch pin if you want to have a brooch, or a pony tail if you  want to have a hair brunchi.

 
 ♥ Enjoy, and Happy hooking!!!


Sunday 17 November 2013

Flower Pin - Cvetni broš


Specialty Stitch:
bp sl st = Back Post sl st. 

Gauge is not important to this project, different size hooks and yarn weights yield different size flowers.The pink flower is 5 1/2 inches(14 cm) and the white flower is 5 inches (12.7 cm) from the edge of one petal to the edge of the opposite petal. Both were made with an I hook and worsted weight yarn.

Insert hook into designated hole from BACK to front, insert hook into next hole from FRONT to back.  Your hook is now laying over a post, yo and pull thru both holes, and the loop on hook. bp sl st made.

ROW 1: ch 2, 7 sc in first ch. Do not join.
ROW 2: *1 sc, 1 hdc, 1 dc, 1 hdc, 1 sc, all in the next st*. Repeat from * to * in each st around. Do not join. (7 petals)

Note: Look at the center of the flower. You'll see a center hole that was made by the stitches of row 1, and 7 holes made by the stitches of row 2. The sides of the holes is called the "post".
The stitches of row 3 will be worked around these posts.

ROW 3: working in the hole made from the last petals, insert hook from BACK to front, around the post and into the next hole from front to back. yo and pull thru both holes, and the loop on hook. BACK POST SL ST made. ch 3, *bp sl st around the next post, ch 3,* repeat from * to * around, sl st in first ch. (7 ch-3 spaces).
ROW 4: * 1 sc, 1 hdc, 2 dc, 1 hdc, 1 sc in next ch-3 space.* Repeat from * to * around.
ROW 5: *bp sl st around next post, ch 4, * repeat from * to * around, sl st in first ch.
ROW 6: * 1 sc, 1 hdc, 3 dc, 1 hdc, 1 sc, in next ch-4 loop. * Repeat from * to * around.
ROW 7: *bp sl st around next post, ch 5, * repeat from * to * around, sl st in first ch.
ROW 8: * 1 sc, 1 hdc, 4 dc, 1 hdc, 1 sc, in next ch-5 loop. * Repeat from * to * around.
ROW 9: *bp sl st around next post, ch 6, * repeat from * to * around, sl st in first ch.
ROW 10: * 1 sc, 1 hdc, 2 dc, 1 tr, 2 dc, 1 hdc, 1 sc, in next ch-6 loop. * Repeat from * to * around.


Fasten off, weave in ends, and sew a safety pin or pin back to the back.

Crochet roses in 9 steps - Heklanje ruže u 9 koraka

A rose is a rose is a rose. But a crochet rose is much better than a rose!


Why, you ask? Well its oh-so-cute, it blooms all round the year in every color you want and what’s more you made it all by yourself! Here’s how you are going to do it, in 10 easy steps.
1. Leaving a 10” length for sewing, chain 57.
online shopping for crochet yarn in india, buy crochet yarn online india
2. Row 1 :In sixth chain from hook, double crochet, chain two, double crochet, *chain 2, skip next 2 chains, then double crochet, chain two, double crochet in next chain; repeat from * across.
online shopping for crochet yarn in india, buy crochet yarn online india
3. This is what your first row finished should look like. Does your row look like a shellfish too? You’re on the right track!
online shopping for crochet yarn in india, buy crochet yarn online india
4. Row 2:  Chain 3, turn, 5 double crochet in first chain-2 space, single crochet in next chain-2 space, (6 double crochet in next chain-2 space, single crochet in next chain-2 space), 5 times.
(With your beginning chain 3 and 5 double crochet “shell” you will have a total of 6 of these shells.  Then (9 double crochet in the next chain-2 space, single crochet in next chain-2 space), 5 more times (you will have a total of 11 shells made).  Then 12 double crochet in the next chain-2 space, single crochet in the next chain-2 space, across until complete.  You should end with a single crochet in the last chain-2 space.  Finish off leaving several inches for sewing and tying.
online shopping for crochet yarn in india, buy crochet yarn online india
5. Once you are done you will have this lovely pile of curly crochet mess.
6. Get yourself a weaving needle with a blunt end. Thread yarn needle from 10” length at beginning of your original chain.
7. With right side facing, and beginning with first petal made, roll your petals, sewing as you go.  Once together, gently tie the two ends together and clip OR use the ends to tie on pin or barrette backs to your rose.
online shopping for crochet yarn in india, buy crochet yarn online india
8. Tie off your bottom, this is what the underneath side of the rose will look like.
online shopping for crochet yarn in india, buy crochet yarn online india
9. This is what the FABULOUS side of your rose will look like!!!
online shopping for crochet yarn in india, buy crochet yarn online india
And there you have it, one pink rose that will bloom all year long!
You can embellish and accessorize everything if you master just this one pattern!

Friday 15 November 2013

M. Richard the Whale - Tutorial kako se pravi!


M. Richard the Whale
by Stacey Trock
ShopMartingale.com

PDF Download : http://goo.gl/NbNBz8


PATTERN NOTES
**  The body is worked from the tail up to the face. You’ll attach features and stuff the
body as you work to ensure that your hands will fit inside when they need to.
**  Work through back loops only.

Fiber Note
Traditional cotton farming makes intensive use of pesticides and chemicals that leech into our underground water supply and sneak into the finished product. Blue Sky Alpacas’ Worsted
Cotton is yarn made from 100% organic cotton—that’s cotton grown without the use of pesticides and chemical fertilizers.
The result is a fabulously so! yarn that you can feel confident about putting against your little baby’s face—somewhere that stuffed animals often end up!


SIDE FINS (MAKE 2.) :
Ch 2.
Rnd 1: Sc 6 in 2nd ch from hook.
(6)
Rnd 2: Sc in each st. (6)
Rnd 3: Sc 2 in each st. (12)
Rnds 4–7: Sc in each st. (12)
Fasten off with long tail.

TAIL :
Start by making 2 flukes (that’s what half a whale’s tail is called).Ch 2.
Rnd 1: Sc 6 in 2nd ch from hook. (6)
Rnd 2: Sc in each st. (6)
Rnd 3: Sc 2 in each st. (12)
Rnd 4: Sc in each st. (12)
Rnd 5: (Sc 2 in next st, sc in next st) 6 times. (18)
Rnds 6–8: Sc in each st. (18) For first fluke, fasten off.For second fluke, don’t fasten off.
Rnd 9 (join flukes): Sc in 9 sts on rnd 8 of yarn-attached fluke, sc in each st on rnd 8 of fastened-off fluke,sc in rem 9 sts of yarnattached fluke. (36)
Rnds 10–11: Sc in each st. (36)
Rnd 12: (Sc2tog, sc in next 4 sts) 6 times. (30)

Rnd 13: (Sc2tog, sc in next 3 sts) 6 times. (24)
Rnd 14: (Sc2tog, sc in next 2 sts) 6 times. (18)
Rnds 15–16: Sc in each st. (18)
Cont stitching to shape body.

BODY
Rnd 17: Sc in next 9 sts, (sc 2 in next st, sc in next 2 sts) 3 times.(21)
Rnd 18: Sc in next 9 sts, (sc 2 in next st, sc in next 3 sts) 3 times.(24)
Rnd 19: Sc in next 9 sts, (sc 2 in next st, sc in next 4 sts) 3 times.(27)
Rnd 20: Sc in next 9 sts, (sc 2 in next st, sc in next 5 sts) 3 times.
(30)
Rnds 21–33: Work in established patt, inc 3 sts per rnd.(69)
Rnds 34–43: Sc in each st. (69)
Rnd 44: (Sc2tog, sc in next 21 sts) 3 times. (66)
Rnd 45: Sc in each st. (66)
Rnd 46: (Sc2tog, sc in next 9 sts) 6 times. (60)
Rnd 47: Sc in each st. (60)
Rnd 48: (Sc2tog, sc in next 8 sts) 6 times. (54)
Rnd 49: Sc in each st. (54)
Rnd 50: (Sc2tog, sc in next 7 sts)6 times. (48)
Rnd 51: (Sc2tog, sc in next 6 sts)6 times. (42)
Rnd 52: (Sc2tog, sc in next 5 sts)6 times. (36)
Rnd 53: (Sc2tog, sc in next 4 sts)6 times. (30)

Remove hook but don’t fasten off.
This big whale was tired of the spotlight, so now he goes by his middle name.
No need to go out into the deep to find him. This cute and cuddly guy is right at your fingertips when you’re holding a crochet hook.2

Assembly step:

See “Attaching Pieces” (page 4). If there’s a small gap where the 2flukes were joined, thread a length of MC in tapestry needle and pull yarn through 1 st on either side of gap.
Tie knot on WS and it’s fixed. Flatten side oftens and attach to rnd 39 of body.
Fasten eyes to rnd 44 of head.Stuff tail and body and cont stitching.
Rnd 54: (Sc2tog, sc in next 3 sts) 6 times. (24)
Rnd 55: Sc in each st. (24)
Rnd 56: (Sc2tog, sc in next 2 sts)6 times. (18)
Rnd 57: (Sc2tog, sc in next st) 6 times. (12)

Assembly step:

Shove a tiny bit more stuffing into tip of head.
Rnd 58: (Sc2tog) 6 times. (6)
Rnd 59: Sc next and 4th sts tog, leaving rem sts unworked.Fasten off, pulling knot to WS.


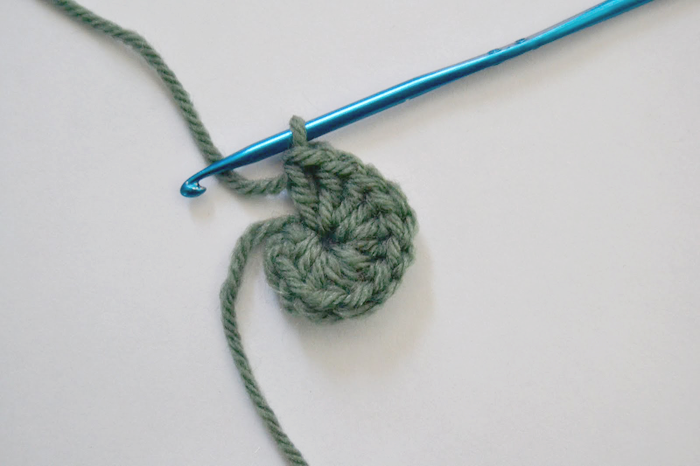
WORKING THROUGH THE BACK LOOPS
When you make a crochet stitch, you end up with two
loops at the top of the stitch: a front loop and a back loop.

This pattern instructs you to crochet through the back loop only. Working through the back loops leaves a little ridge (the unused front loops) that’s not only cute but helps with attaching the pieces.

ATTACHING PIECES
The animals are made by crocheting all of their
little parts, stu"ng the parts, and then attaching
the parts to complete the animal.
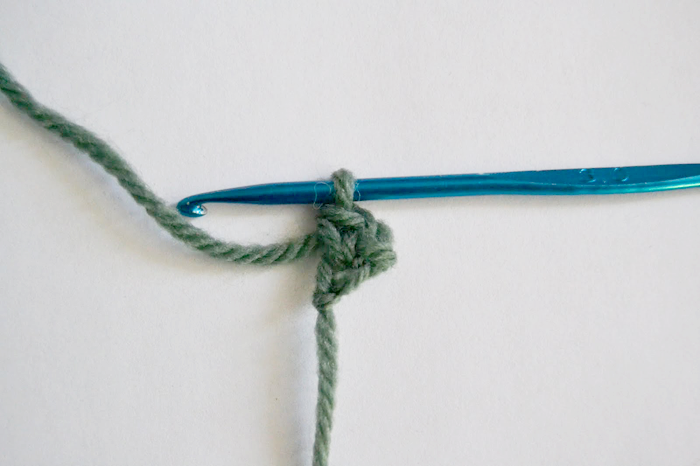
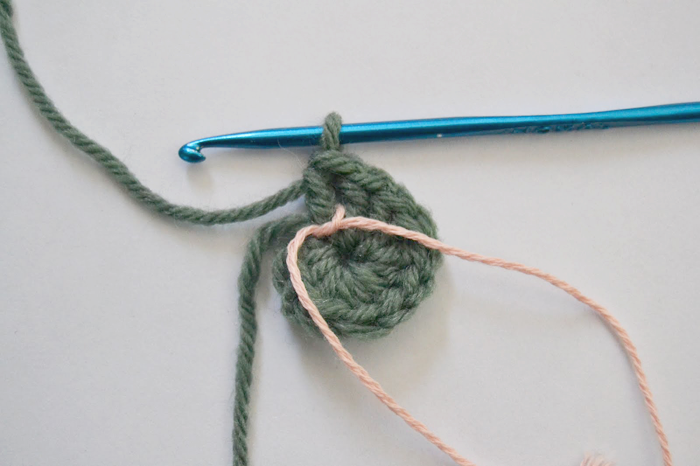
A Clean Start

For a nice finish, it’s best to take a little step before
attaching your animal’s body parts. Thread the
long tail through a tapestry needle and begin by
inserting your tapestry needle through the back
loop of the next stitch as shown. This tucks the
little knot that you made into the body part and
makes it less likely to show on your finished piece.
You will now use this tail to attach the body part
to the background.

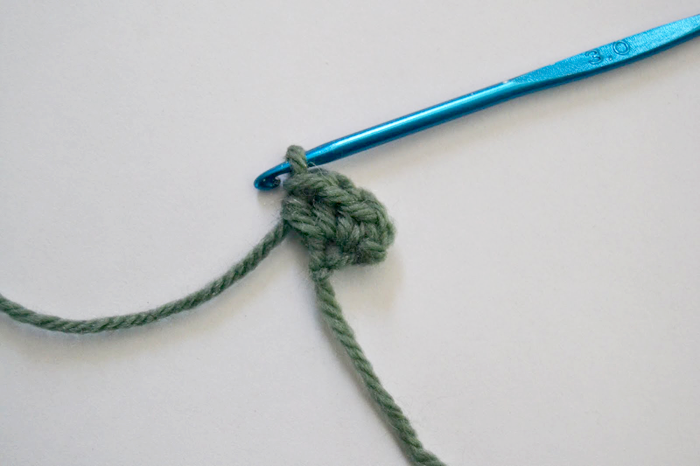
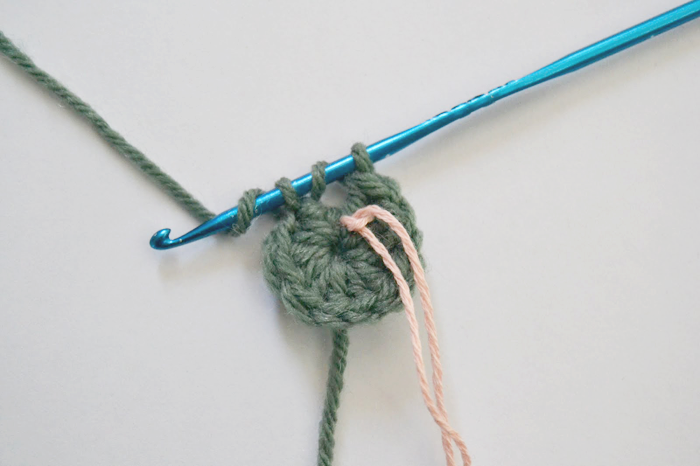
Attaching Body Parts
Use this technique for attaching body parts, such
as a head or an arm, to animal bodies. Begin with
the clean start (above), and then insert the needle
through one stitch on the background piece and
through the back loop of the next stitch on the
body part.

Continue in this manner until you’ve completely
attached your piece. To finish, tie a knot on
the wrong side of the body.
The pattern instructions indicate where to
attach the various body parts. For example, you’ll
see something like “attach bottom of legs to rnd 8
of body.” To translate, the bottom of the leg will
be attached to round eight of the body and the
remainder of the leg will be positioned accordingly.
This means that the top will be attached to approximately
round 13 of the body—but you don’t need
to be too picky. Just do what looks good.

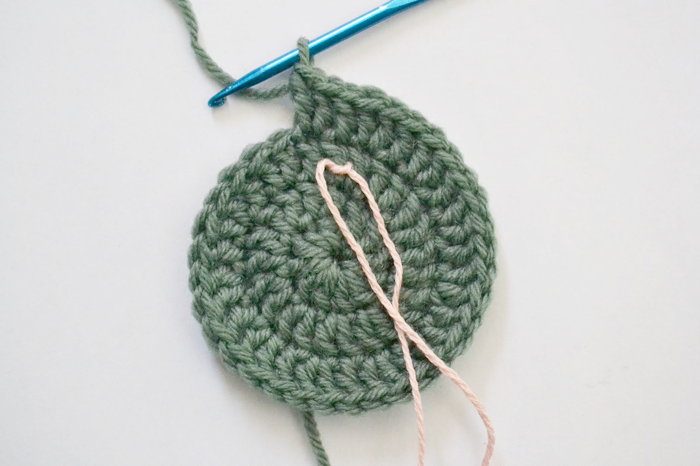
Attaching Flattened Pieces

Some pieces are crocheted in the round and then
flattened before attaching. To do this, begin by
flattening the piece, with the fastened-off stitch on
the right-hand side. Use the clean start, and then
insert the needle through one stitch on the background
piece and through the back loop of both
layers of the next stitch on the flattened piece as
shown.

 Continue stitching in this manner until you’ve
completely attached your piece. To finish, tie a
knot on the wrong side of the body.

 STUFFING ANIMALS
To create a nice-looking stuffed animal, you’ll
need to put in a fair amount of stuffing. I always
stuff the animal with slightly more than I think
I’ll need, because the stu"ng tends to compress
over time—especially after lots of hugs! If stuffing
shows through the animal, this is a sign that your
stitches are too loose and you should go down
a hook size. To avoid disappointment, you may
want to test-stuff a piece to make sure it looks
good before you complete the whole project.

Monday 11 November 2013

The Spiral Crochet - Spiralno Heklanje

 Freeform crochet basics: the spiral


The Double Crochet Spiral

Chain 2.
Freeform crochet spiral
Into the first chain, make 2 single crochet …
Freeform crochet spiral
2 half double crochet …
Freeform crochet spiral
and 8 double crochet.
Freeform crochet spiral
Mark the last stitch with a marker or a thread. This is the last stitch of the first round.
Freeform crochet spiral
Do not join the first and last stitch of the first round, but continue by making the next double crochet into the first single crochet. Double crochet again in the same stitch.
Freeform crochet spiral
2 double crochet into each stitch all the way round (24 stitches).
Freeform crochet spiral
1 double crochet in the next stitch, 2 double crochet in the next stitch. Continue this way all around (36 stitches).
Freeform crochet spiral
And there you have it! One double crochet spiral.

Thursday 7 November 2013

Pufnaste Latice Heklanog Cvetića (Petal Puff Stitch Flower )


Materials:
*G hook
*Worsted weight Yarn in 2 colors
I used Cascade 220 wool solids
*yarn needle
*Scissors

Finished Flower has a diameter of about 2"

....you've got the Power to make this Flower ( :

Ch 4, sl st to first ch to form a loop.
Rnd 1 – Ch 1, work 12 sc’s into loop.

Change Color
Rnd 2 – sl st into first ch, *Ch 3
yarn over, insert hook into same stitch, yarn over and pull up a loop as tall as your beginning ch 3 (long loops formed)
(yarn over, insert hook into same stitch, yarn over and pull up a long loop) 2 times, yarn over, insert hook into next stitch, yarn over and pull up a long loop, (Yarn over, insert hook into same stitch, yarn over and pull up a long loop) 2 times.
Yarn over and pull through all loops on hook. (one petal formed) Ch 2, sl st into next stitch.
 Back View
Repeat From * four more times.
Ch 3, yarn over, insert hook into next stitch, yarn over and pull up a long loop, (yarn over, insert hook into same stitch, yarn over and pull up a long loop) 2 times, yarn over, insert hook into next stitch, yarn over and pull up a long loop, (yarn over, insert hook into same stitch, yarn over and pull up a long loop) 2 times. Yarn over and pull through all loops on hook. Ch 2 and sl st into same st.
Fasten off and weave in ends.

Saturday 2 November 2013

Small Owls - Male sovice


Skills required
Crocheting in round, single crochet stitch, magic ring, increasing, invisible decreasing, finishing an open piece (see tutorial 3), fastening yarn tails.

Size
About 6,5cm (2.6”), with worsted weight cotton yarn and a 2,25 mm crochet hook (US size 1/B).

Materials & Tools
- Yarn. I used worsted weight cotton, 92m/50g (100yds/50g) / 10ply / 9wpi / 4: medium. You will need about 17g or 31m (34yds) of yarn – 12g for the body and 5g for details.
- 2,25 mm crochet hook (US size 1/B).
- Stuffing - polyester fiberfill, wool, wadding etc.
- 9mm (1/3”) safety toy eyes or buttons, beads, felt etc.
- Embroidery floss.
- Yarn needle, scissors, stitch marker.

Abbreviations
- mr, n = magic ring - crochet n single crochet stitches in to the loop.
- sc = single crochet stitch
- sc n = make n single crochet stitches, one in each stitch
- inc = increase – make two single crochet stitches in to the same stitch
- inc3 = double increase – three single crochet stitches in to the same stitch
- dec = decrease – crochet two stitches together
- (sc 2, inc) x 6 = repeat the pattern between brackets six times
- (24) = number of stitches in a round after finishing said round

Notes
- Do not join at the end of each round, work in a continuous spiral.
- Use a stitch marker or a piece of yarn to mark the end or the beginning of a round. Move the marker up after completing each round.
- All stitches are worked into both loops.

Body
Worked from bottom to top.
1: mr, 6 = (6)
2: (sc, inc3x 2) x 2 = (14)
3: sc 3, inc3x 2, sc 5, inc3x 2, sc 2 = (22)
4: sc 4, inc x 3, sc 8, inc x 3, sc 4  (28)
5: sc 6, inc x 2, sc 12, inc x 2, sc 6  (32)
Place a stitch marker (or a piece of yarn) in to
the 19th stitch on round 11. This marks the
center of the face.

6-12: sc in each stitch = (32)
13: sc 10, dec, sc 14, dec, sc 4 = (30)
14: sc 14, dec, sc 4, dec, sc 8 = (28)
15: sc 6, dec, sc 18, dec = (26)
16: sc 2, dec, sc 11, dec, sc 9 = (24)
17: sc, dec, sc 8, dec, sc 3, dec, sc 6 = (21)
18: sc, dec, sc 4, fasten off = (20)
Make a slip stitch in to the next stitch. Cut
the yarn, leaving a long tail and draw the
end through the stitch. Attach safety eyes
and then stuff the body. Leave the top
seam open for now.


free amigurumi owl pattern
amigurumi miniature owl

Eye patch - safety eyes
Note! Join all rounds with a slip stitch (sl st)
to get perfectly round eye patches.
1: mr, 7, join round with a sl st = (7)
NB! Insert the safety eye in to the loop and
draw the loop tightly closed around it.

2: ch 1, inc, around = (14)
Fasten off cleanly and weave in the yarn
tail on the wrong side.


Eye patch - embroidered eyes
Note! Join all rounds with a slip stitch (sl st)
to get perfectly round eye patches.
1: mr, 7, join round with a sl st = (7)
2: ch 1, inc, around = (14)
Fasten off cleanly and weave in the yarn
tail on the wrong side.


free crochet toy tutorial
free crocheted owl pattern

Left wing

1: mr, 6 = (6)
2: inc x 2,[sc,hdc],[hdc,dc],[dc,tc,tc] = (11)
Right wing
1: mr, 6 = (6)
2: [sl st, ch 3, tc, dc], [dc, hdc], [hdc, sc],
inc x 2 = (11)
Cut the yarn and weave in the yarn tail. Finish
the edge by crocheting around it with single
crochet stitches (see below).